Friday, January 24, 2025
Simple wooden shed ideas for new builders
Simple Wooden Shed Construction: A Beginner's Guide to Design and Build
Constructing a wooden shed presents a rewarding project for novice builders, offering a valuable learning experience alongside a practical addition to one's property. This guide details the planning and execution of several simple shed designs, tailored for beginners with limited carpentry experience. By focusing on straightforward construction techniques and readily available materials, this guide aims to empower aspiring builders to successfully complete their own shed projects.
I. Planning Your Shed Project

A. Defining Requirements and Site Selection:
Before commencing any construction, careful planning is paramount. The first step involves defining the purpose of your shed. Will it serve as a storage unit for gardening equipment, a workshop, or a combination of uses? This determination dictates the necessary size, internal features, and overall design. Consider the dimensions required to comfortably accommodate your intended contents, allowing ample space for maneuverability. Subsequently, select a suitable location on your property. Ensure the chosen site offers level ground, sufficient sunlight (if desired), and easy access for material delivery and future maintenance. Check local building codes and regulations regarding shed placement and size limitations before proceeding.
B. Selecting Appropriate Materials:
The selection of materials significantly impacts the longevity and structural integrity of your shed. For beginners, pressure-treated lumber is highly recommended due to its inherent resistance to rot and insect infestation. This pre-treated wood requires minimal additional protection and simplifies the building process. Specify the dimensions of the lumber based on your chosen design, ensuring sufficient strength for the intended load-bearing capacity. Consider using readily available standard sizes to minimize cutting and waste. In addition to lumber, you will require fasteners such as galvanized nails or screws, which offer superior corrosion resistance compared to standard steel fasteners. Other necessary materials include roofing felt, roofing material (e.g., asphalt shingles, corrugated metal), and appropriate foundation materials (concrete blocks, gravel, or a concrete slab).
C. Essential Tools and Equipment:
Having the correct tools readily available significantly enhances the efficiency and safety of the construction process. Essential tools include a measuring tape, level, saw (circular saw or hand saw), hammer or nail gun, drill, spade or shovel (for ground preparation), and safety glasses or a face shield. While a power drill and circular saw can greatly speed up the process, a hand saw and brace and bit are viable alternatives for beginners with limited access to power tools. It is crucial to prioritize safety by using appropriate personal protective equipment (PPE) throughout the construction phase.
II. Simple Shed Designs for Beginners
A. The Lean-To Shed:
This design is the simplest and most accessible for beginners. A lean-to shed relies on an existing wall or structure for one side, reducing the complexity of the framework. The design typically consists of a sloping roof supported by posts or rafters attached to the existing wall. The construction primarily involves framing the supporting structure, adding sheathing, and applying the roofing material. The lean-to shed requires minimal carpentry skills and is an ideal introduction to shed construction for novices. Foundation requirements are minimal, often consisting of a compacted gravel base to ensure adequate drainage. Its compact nature makes it suitable for smaller gardens or areas with limited space.
B. The Gable Shed:
The gable shed is a more substantial structure compared to the lean-to, featuring a triangular roof with two sloping sides. While slightly more complex, it is still achievable for beginners, provided careful planning and execution. The framework involves constructing a rectangular base frame, erecting the walls, and constructing the roof trusses. Gable sheds offer a more spacious interior compared to lean-to sheds, and the triangular roof provides better water runoff and snow shedding capabilities. The foundation may range from simple concrete blocks to a more robust concrete slab depending on the size and local conditions. This design necessitates a higher level of carpentry skill compared to the lean-to, but detailed plans and step-by-step guides are widely available.
C. The A-Frame Shed:
Similar to the gable shed in terms of roof style, the A-frame shed simplifies construction by directly connecting the roof rafters to the ground, eliminating the need for separate wall framing. This results in a very sturdy and efficient structure. This design is particularly suitable for smaller sheds and is a good intermediate project for builders who have gained some experience with the lean-to or gable shed designs. Foundation preparation remains crucial, with a level base being essential for structural stability. The simplicity of the design makes it attractive for beginners seeking a challenge beyond the basic lean-to design, offering a compact and visually appealing structure.
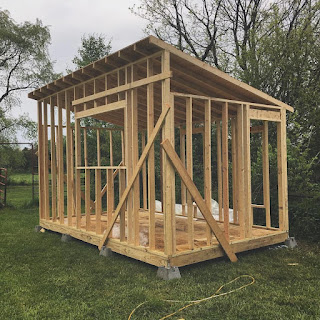
III. Construction Steps: A General Overview
Regardless of the specific shed design chosen, the general construction process involves several key steps. First, prepare the site by clearing the area and leveling the ground. Establish the foundation using your chosen method (e.g., concrete blocks, gravel base, concrete slab). Then, construct the base frame, ensuring it is square and level. Erect the walls, attaching them securely to the base frame. Construct the roof frame, carefully aligning the rafters or trusses and ensuring proper support. Add sheathing to the walls and roof, providing a solid surface for the exterior cladding. Finally, apply the roofing material, followed by the exterior cladding (e.g., siding, shiplap). Remember to meticulously check for squareness and levelness at each stage to ensure the shed's structural integrity.
IV. Finishing Touches and Maintenance
Once the main construction is complete, several finishing touches can enhance the shed's functionality and aesthetics. Consider adding a door and windows, providing access and natural light. Interior walls can be added for enhanced organization, and shelving can be installed for efficient storage. Exterior finishing touches such as painting or staining will protect the wood from the elements, improving longevity and aesthetics. Regular maintenance, including inspecting the structure for any signs of damage or deterioration, will significantly extend the lifespan of your shed. Prompt repairs and preventative measures, such as re-staining or repainting, are crucial for maintaining the structural integrity and visual appeal of your self-built wooden shed.
Note: This guide provides a general overview. Always refer to detailed plans and instructions specific to your chosen shed design. Consult with experienced builders or professionals if you encounter any challenges or uncertainties during the construction process.
No comments:
Post a Comment